

Continental U.S. only.
Continental U.S. only.
Tea towels are one of the most versatile craft blanks available — inexpensive at volume, washable, available in multiple sizes, and made from 100% cotton that accepts sewing, embroidery, fabric paint, and dye. The 30+ projects here range from quick weekend projects to more involved sewing patterns, covering everything from baby bibs to full-length aprons.
We supply blank flour sack tea towels to crafters and sewing enthusiasts — no minimum order, 5 sizes, ships in 1 business day. All projects below work with the 27×27 inch square unless noted otherwise.


Tea towels make excellent pillow covers — the measurements can be adjusted to fit any existing pillow form. The flat, finished edges of a flour sack towel mean most of the hemming work is already done, which makes this one of the faster sewing projects on the list.
These work equally well as sofa additions, teen room accents, housewarming gifts, or guest room furnishings. One towel typically covers a 16×16 inch pillow form; use two towels for front and back coverage with no additional fabric needed. A patterned or embroidered towel produces a result that looks far more considered than a store-bought pillow at a fraction of the cost.
Difficulty: Beginner · Time: 30–45 minutes · Materials: 1–2 towels, pillow form, thread
Tutorial: mmmcrafts.blogspot.com

Square fabric coasters cut from a single towel are highly absorbent, washable, and more protective of table finishes than paper or cork alternatives. Unlike ceramic or stone coasters, fabric ones are quiet, stackable, and machine washable — you can throw them in with the kitchen linens without any special care.
A single 27×27 inch towel yields 4–6 coasters depending on your preferred finished size. Layer two pieces of fabric for thickness and stitch around the edges for a clean finish. These are ideal for tea and luncheon settings, and rotating seasonal designs keeps the table looking fresh year-round without significant expense.
Difficulty: Beginner · Time: 20–30 minutes · Materials: 1 towel, optional batting for thickness

Dust and lint are the enemy of sewing machines — both get inside the mechanism and cause skipped stitches, thread breakage, and tension problems. A fitted cover prevents all of this with minimal effort. The construction is essentially a shaped rectangle with hems, sized to fit your specific machine.
Measure your machine carefully — height, width, and depth — before cutting. Add a couple of inches on all sides for a relaxed fit that slips on and off easily. One large towel is usually sufficient for a standard home sewing machine; two may be needed for larger models. Make extras to give to sewing friends — they will actually use them.
Difficulty: Beginner · Time: 20–30 minutes · Materials: 1–2 towels, thread

Buy several matching tea towels and you have exactly enough material to make a coordinated set of potholders and dish towels — the matching set effect makes these feel like a considered gift rather than a craft project. Layering is the key to a functional potholder: you need enough thickness to protect against heat, which typically means three or four layers of cotton fabric.
Cut squares or rectangles to your preferred size, layer them up, and stitch through all layers in a grid pattern — this creates the quilted look and keeps the layers from shifting in use. Binding the edges with bias tape gives a professional finish. A complete set of four potholders plus four matching dish towels from the same towel pattern makes one of the most practical housewarming gifts available.
Difficulty: Beginner-Intermediate · Time: 45–60 minutes per set · Materials: 2–3 matching towels, optional bias tape
Tutorial: artsycraftybabe.typepad.com

Tea towels often carry better designs and more vibrant colors than standard curtain fabric at a fraction of the cost, and the four pre-hemmed edges mean the only sewing required is a rod pocket at the top. The existing hems handle everything else — no measuring, cutting, or finishing side and bottom edges.
For a standard kitchen window, two or three towels hung side by side create a café-style valance that lets in light while adding color. For a more layered look, hang a sheer panel behind and the towel curtains in front. Because the cost per set is so low, keeping seasonal sets — a floral spring set, a harvest autumn set, a simple winter set — is practical and effective. The cotton fabric also diffuses light beautifully without being heavy or blocking the view.
Difficulty: Beginner · Time: 15–20 minutes per panel · Materials: 2–3 towels, curtain rod, thread
Tutorial: westcoastcrafty.com

Cut a single tea towel into napkin-sized pieces, hem the edges, and you have a set of washable cocktail napkins that outperform disposable paper in both appearance and absorbency. A single 27×27 inch towel typically yields four cocktail napkins or two standard dinner napkins depending on your preferred finished size.
The fabric holds up through a full evening of use without disintegrating the way paper does — and because these are washable, there's no waste to deal with at the end of the night. Seasonal or patterned towels produce sets that feel like a deliberate table setting choice rather than an afterthought. Make them in sets of eight or twelve so you always have enough for a full table. These also make genuinely practical hostess gifts when tied together with a ribbon.
Difficulty: Beginner · Time: 30–45 minutes per set of 4 · Materials: 1 towel per 4 napkins, thread
Tutorial: jennysteffens.blogspot.com

Tea towels combined with carpet remnants or non-slip backing material make practical, washable mats for the most high-traffic spots in any home — in front of the kitchen sink, beside the bathtub, outside the shower stall, next to the bed, or at the front door. The cotton surface is soft underfoot, absorbent for wet areas, and machine washable when dirty.
The construction involves attaching the towel to a non-slip backing, which can be cut carpet remnant, a purchased non-slip mat pad, or rubberized shelf liner. Stitch the two together around the perimeter to keep them aligned during washing. Because towels are inexpensive at volume, making matching sets for multiple rooms from the same pattern gives the home a coordinated look at minimal cost. Replace them when worn without guilt — that's the point of using an inexpensive blank.
Difficulty: Beginner · Time: 20–30 minutes · Materials: 1 towel, non-slip backing, thread
Tutorial: madewithlovebyhannah.com

Bar stool and kitchen stool seats can be refreshed with a tea towel cover using either a no-sew wrapping technique or basic sewing. The no-sew method involves cutting the fabric slightly larger than the seat, wrapping it to the underside, and securing with a staple gun or strong adhesive — the whole process takes under 10 minutes per stool.
This approach works equally well for covering scratched or marked second-hand stools, coordinating mismatched stools in a kitchen, or personalizing a set for different family members. Because the covers can be swapped out, seasonal or holiday patterns are practical — switch them when the season changes rather than replacing furniture. The cotton fabric is also comfortable to sit on in warm weather, unlike vinyl or hard wood.
Difficulty: Beginner · Time: 10 minutes per stool (no-sew) · Materials: 1 towel per stool, staple gun or adhesive
Tutorial: inmyownstyle.com
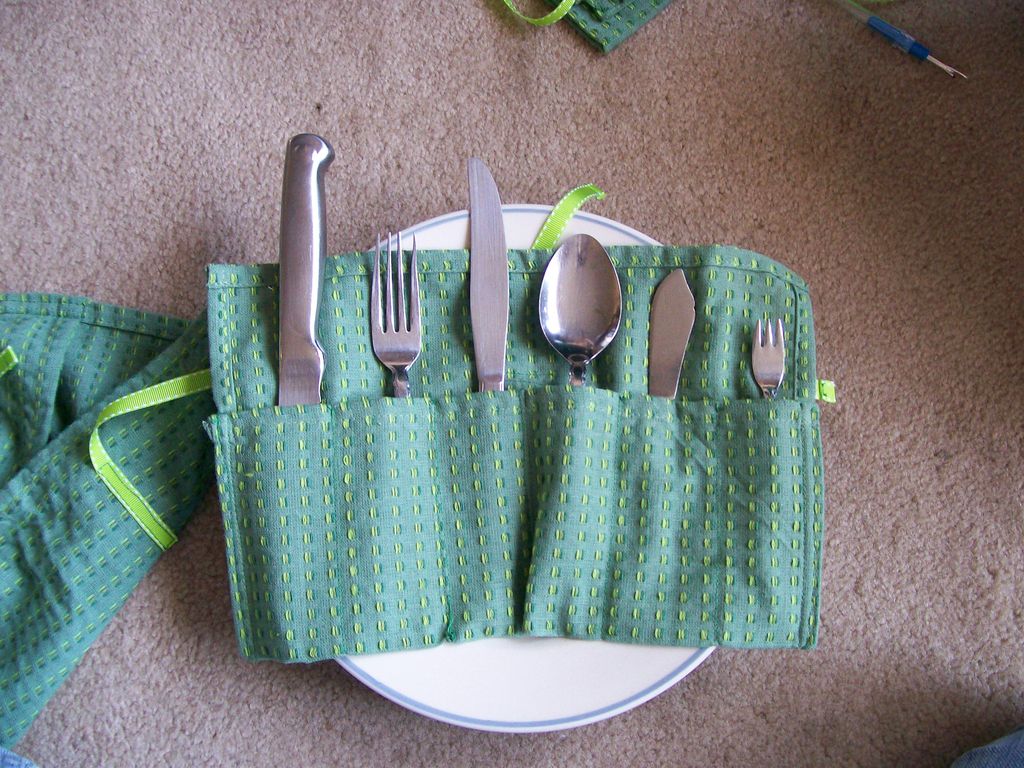
A rolled fabric holder keeps plates, cutlery, and napkins clean and together for picnics, camping trips, or glamping outings. The basic construction involves folding the towel and sewing a few pockets to hold each item in place — roll it up when packed and unroll it flat when you arrive.
The absorbent cotton means you can put items away slightly damp without worrying about mildew — a practical advantage over rigid plastic holders. Adding a simple fabric handle lets you hang it from a hook inside a camper, cabin, or car boot. This project requires minimal sewing — mostly straight lines — and can be completed in under an hour. It also makes a thoughtful practical gift for anyone who camps or picnics regularly.
Difficulty: Beginner · Time: 45–60 minutes · Materials: 1–2 towels, thread, optional ribbon for tie
Tutorial: instructables.com

A tea towel plus some sturdy cord makes a drawstring shoe bag that keeps a pair together for school, travel, slumber parties, and camping. The construction is minimal — fold the towel, sew the sides, add a drawstring channel at the top, and thread the cord through. The whole project takes under 30 minutes and requires only straight stitching.
Make one for each child in a distinctly different towel pattern so bags never get confused at school or sports practice. The cotton breathes well, which means shoes dry out properly inside the bag rather than developing odor the way they would in a plastic bag. The towel is also absorbent enough to wipe muddy shoes before putting them in, which makes these practical for sports kit as well as everyday school shoes.
Difficulty: Beginner · Time: 20–30 minutes · Materials: 1 towel, sturdy cord or ribbon, thread
Tutorial: curlypops.blogspot.com

Two tea towels sewn together make a durable, washable tote bag suitable for groceries, the farmers market, beach days, or everyday errands. The cotton is machine washable, which gives it a clear advantage over non-woven polypropylene bags that can't be washed and degrade after repeated use.
Use a tightly woven towel for best results — the 130 thread count plain weave of a flour sack towel holds heavier loads reliably without stretching or distorting. Stitch the handles on through multiple passes for strength, and make them at least 1.5 inches wide so they sit comfortably on the shoulder. Longer straps allow the bag to hang over the shoulder easily — add 4-6 inches to the standard handle length if you plan to carry it that way. A flat bottom panel gives the bag structure when loaded.
Difficulty: Beginner · Time: 45–60 minutes · Materials: 2 towels, sturdy fabric for handles, thread
Tutorial: whatsthatgonnabe.blogspot.com

A padded tea towel laptop tote is a surprisingly practical project — the wide straps distribute weight comfortably, the cotton exterior is more pleasant to carry than a nylon bag, and the result is genuinely distinctive in a sea of identical black laptop cases. Use a tight, sturdy weave for the outer fabric and layer in quilt batting or foam padding for impact protection.
Measure your laptop before cutting — add at least an inch on all sides for a comfortable fit plus the thickness of the padding. Adjusting dimensions for any laptop size is straightforward. Adding interior pockets for a charger, cables, and headphones significantly improves usability and only adds 20-30 minutes to the project. Wide handles and a longer strap option make this comfortable to carry all day. One of the more involved projects on this list but also one of the most useful and personal.
Difficulty: Intermediate · Time: 2–3 hours · Materials: 2 towels, batting/foam, sturdy fabric for handles, optional zipper
Tutorial: writemamawrite.blogspot.com

A dedicated library tote gives children a specific place for borrowed books — which means fewer lost books and late fees. The construction is similar to a basic tote bag but slightly smaller, and the single-purpose design helps children build the habit of returning it to the same spot after every library visit.
Choose a thicker, sturdier towel for this project — several books together are heavier than they look, and the bag needs to hold the weight without stretching or the handles pulling loose. Reinforce the handle attachment points with extra stitching. A bright, distinctive towel makes the bag easy to spot in a backpack or pile of coats. Add the child's name in embroidery or fabric marker for a personal touch.
Difficulty: Beginner · Time: 45–60 minutes · Materials: 2 towels, sturdy handle fabric, thread
Tutorial: ihavetosay.typepad.com

A washable fabric lunch bag is more hygienic than a plastic lunchbox — cotton breathes rather than trapping moisture and odor, and the whole bag goes in the washing machine rather than needing to be wiped down inside. Use distinct towel patterns for each child so bags never get confused in the school cloakroom.
Insulated lining can be added for temperature control — quilted or foil-lined fabric sewn inside keeps food cooler for longer. A velcro or snap closure at the top is simpler to operate than a zip for younger children. Make a strap long enough to hang from a coat hook or slip over a chair back at school. Machine washable — toss it in with the kitchen laundry at the end of the week.
Difficulty: Beginner-Intermediate · Time: 60–90 minutes · Materials: 2 towels, optional insulated lining, velcro or snaps
Tutorial: firefliesandjellybeans.com

Tea towel fabric makes excellent baby bibs — the 100% cotton is gentle against skin, highly absorbent, and durable through repeated hot washing without degrading. Standard store-bought bibs are often made from synthetic blends that resist staining rather than absorbing it, which means messes spread to clothing instead. A cotton bib actually absorbs.
The pattern is adjustable for newborns through toddlers — cut a wider neck opening for larger babies and scale the bib body up accordingly. Finish the neck edge with bias tape for comfort against sensitive skin. A snap or velcro closure at the back works better than ties for small children. A patterned or brightly colored tea towel produces bibs that look charming in photos — an unexpected bonus for parents who photograph every meal.
Difficulty: Beginner · Time: 30–45 minutes · Materials: 1 towel (yields 2–4 bibs), bias tape, snaps or velcro
Tutorial: bkids.typepad.com

A braided tea towel makes a durable, textured chew toy for teething puppies. Cut the towel lengthwise into three equal strips and braid them tightly, knotting securely at both ends. The cotton texture is soft enough to be gentle on new teeth while providing the resistance a teething dog needs. The entire project requires no sewing — just cutting and braiding.
This is one of the best uses for older tea towels that have stained or worn but are still structurally intact. The cotton is safe for dogs to chew — no synthetic fibers or coatings to ingest. Avoid using towels treated with fabric softener, bleach, or any chemical finish. Check the braid periodically for loose threads that could come free during aggressive chewing. When the toy shows significant wear, replace it — the cost of a blank towel makes replacement easy.
Difficulty: No sewing required · Time: 10 minutes · Materials: 1 older towel, scissors

A small zippered pouch cut from a tea towel makes a coin purse, makeup bag, pencil case, or business card holder — the same pattern scaled to different sizes. The basic construction is two fabric panels with narrow hems on three sides and a zipper installed across the top. This is one of the better introductory zipper projects because the scale is small and forgiving.
The finished size determines the use: 4×4 inches works for coins and cards, 6×8 inches for makeup essentials, 4×10 inches for pencils. Use a patterned tea towel and the exterior looks deliberate and personal rather than homemade. These make excellent stocking stuffers — quick to produce in batches once the zipper technique is comfortable, and small enough to be useful without being a token gesture. Choose the pattern based on the recipient's interests and the gift feels considered.
Difficulty: Beginner-Intermediate · Time: 30–45 minutes · Materials: 1 towel (yields 4–6 small pouches), zippers, thread
Tutorial: obsessivelystitching.blogspot.com

A tea towel book cover slides over a journal, diary, or cookbook and protects it without any permanent attachment to the book itself — the cover slips off when you want to change it or pass the book on. The construction involves folding the towel around the book and creating sleeve pockets at each end that hold the cover and back board in place.
Food-themed and botanical tea towels look particularly well-suited as cookbook covers — the subject matter matches the content. A journal covered in a bright or meaningful pattern is more likely to be picked up and written in than a plain notebook sitting on a desk. Stack several covered books in different coordinating patterns on your kitchen counter for a warm, layered display that costs almost nothing to achieve. These also make excellent gifts for avid readers or journal-keepers.
Difficulty: Beginner · Time: 20–30 minutes · Materials: 1 towel, optional iron-on hem tape for a no-sew version
Tutorial: elefantz.com
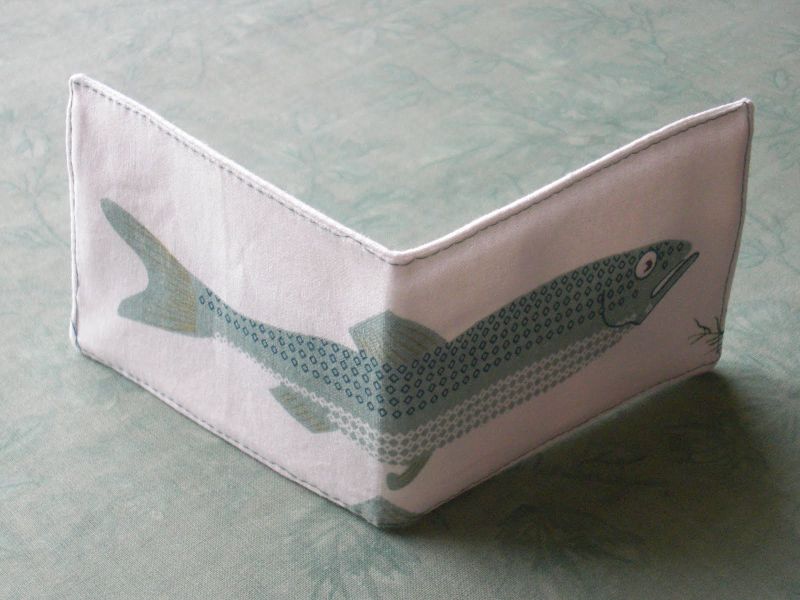
A slim fabric wallet sewn from a tea towel is sturdy enough for daily use and thin enough to sit flat in a pocket without creating a visible outline. The basic bifold construction involves folding a rectangle, stitching the sides, and adding interior card slots. The cotton construction is actually more flexible and comfortable in a pocket than a leather wallet of comparable size.
The pattern choice makes or breaks this gift — choose something the recipient would actually carry rather than the most attractive towel you own. Plaids, checks, and outdoor scenes work well for boys who are unlikely to specify preferences in advance. A small embroidered initial or monogram on the front turns a functional object into something personal. This is also a good project for using up attractive smaller pieces from older towels that aren't large enough for aprons or bags.
Difficulty: Beginner-Intermediate · Time: 45–60 minutes · Materials: 1 towel, optional interfacing for structure, thread
Tutorial: obsessivelystitching.blogspot.com

Two or three tea towels sewn together make a toddler bathrobe that most small children put on immediately after bath time and resist taking off until bedtime. The 100% cotton is soft against skin that's still warm from the bath, highly absorbent, and durable through repeated washing — qualities that standard children's robes at this size often lack.
The pattern involves a main body panel, two sleeve pieces, and a belt — nothing technically complex. Adding a hood from an additional small piece of towel is a popular variation that most children love. The finished robe is machine washable and gets softer with each wash rather than rougher. A patterned towel produces a robe with enough visual interest that children actively want to wear it. Makes an excellent baby shower or first birthday gift — functional, personal, and more durable than most standard baby gifts at the same price point.
Difficulty: Intermediate · Time: 2–3 hours · Materials: 2–3 towels, ribbon or fabric tie belt, thread
Tutorial: obsessivelystitching.blogspot.com
Tea towels are the traditional blank for handmade aprons — the pre-finished edges reduce the amount of hemming required, and the 100% cotton holds up through repeated washing and heavy use in the kitchen. Most half aprons require one tea towel plus some ribbon or fabric for ties. Full-length aprons need two or three towels.
All the following patterns use standard sewing techniques — straight seams, basic hems, and simple waistbands. If you're new to sewing, the simpler half aprons are good starting projects. The more elaborate versions with gathered fabric, multiple pockets, or ruffling are still manageable for intermediate sewers.

A full apron with a bib works best with bold geometric prints on the towel. Two towels, a waistband, and neck and waist ties are all the materials required. This pattern suits any kitchen use from heavy cooking to baking and provides the most coverage of any apron format.
Difficulty: Intermediate · Time: 60–90 minutes · Materials: 2 towels, ribbon or cotton tape for ties, thread
Tutorial: polkanuts.blogspot.com

A half apron made from a decorative tea towel needs minimal sewing — attach waist ties to the top corners and hem the bottom edge if needed. Perfect for a brunch or breakfast-in-bed setup where appearance matters as much as function.
Difficulty: Beginner · Time: 20–30 minutes · Materials: 1 towel, ribbon for ties, thread

The simplest apron format — one towel, two ties. Works for cooking, gardening, crafting, or any messy activity. Takes under 15 minutes to make once the materials are gathered.
Difficulty: Beginner · Time: 10–15 minutes · Materials: 1 towel, ribbon or cord for ties

A ruffled hem transforms a basic apron into something more elegant. Pin the towel into small pleats along the waistband, sew across, and the ruffle forms naturally. Almost lacy in appearance, this style makes everyday kitchen tasks feel more considered.
Difficulty: Beginner-Intermediate · Time: 30–45 minutes · Materials: 1 towel, waistband fabric or ribbon, thread

Simple in construction with decorative trim added at the waistband and edges — this apron combines utility with personalisation. Mixing complementary colors between the trim and towel produces a coordinated look without needing a patterned fabric.
Difficulty: Beginner · Time: 30–45 minutes · Materials: 1 towel, decorative trim, ribbon for ties
Tutorial: montessoribyhand.blogspot.com

Three front pockets sewn onto a sashed half apron — practical for holding kitchen tools, a phone, or small items while cooking. Whimsical in design but highly functional. A good choice for a personalized gift paired with kitchen gadgets.
Difficulty: Beginner-Intermediate · Time: 45–60 minutes · Materials: 1 towel, ribbon or fabric for waistband and ties, thread
Tutorial: vanessachristenson.com

A more traditional apron silhouette with soft gathered fabric at the waist and front pockets. The gathering is achieved by sewing the towel onto a narrower waistband — the excess fabric falls into soft folds. More substantial than a simple half apron and useful for longer cooking sessions.
Difficulty: Intermediate · Time: 60–75 minutes · Materials: 1–2 towels, waistband fabric, ribbon or tape for ties
Tutorial: thepickledweasel.blogspot.com

An unusual format that you're unlikely to find replicated elsewhere — practical in ways that aren't immediately obvious until you try it. Worth looking at the tutorial for this one specifically, as the construction produces something genuinely different from standard apron patterns.
Difficulty: Intermediate · Time: 45–60 minutes · Materials: 1–2 towels, thread

A small, chic apron designed for hosting rather than heavy cooking. Protects clothing during food preparation and drinks service without the bulk of a full kitchen apron. A decorative or patterned towel produces the best result here.
Difficulty: Beginner · Time: 20–30 minutes · Materials: 1 towel, ribbon for waist ties, thread
Tutorial: bittycakes.wordpress.com

A full-length apron with a large centered pocket — practical for babysitters, childcare workers, and bakers who need to keep tools close to hand. Easy to move in and versatile for different tasks.
Difficulty: Intermediate · Time: 60–90 minutes · Materials: 2–3 towels, ribbon or tape for ties, thread
Tutorial: mybyrdhouse.blogspot.com

Sturdy ties and a generous front pocket across the full width of the apron. Everything fits — phone, tools, recipe cards. A simple construction that prioritises function over form, and finishes quickly.
Difficulty: Beginner · Time: 30–45 minutes · Materials: 1 towel, ribbon or cotton tape for ties, thread
Tutorial: pinkpistachio.com

A children's art apron with bias tape trim, geometric cuts, pockets, and adjustable ties protects clothing during painting, clay, collage, and any other messy creative activity. The cotton absorbs paint and craft glue rather than repelling them, which means it does its job properly rather than letting things slide off onto clothes underneath.
The pattern is adjustable for different ages — scale the dimensions up as the child grows. Adding a wide neck opening and easy-to-tie strings at the back makes the apron something a child can put on independently rather than needing adult help every time. Bias tape around all the edges gives the finished apron a clean, durable look that holds up through years of use. Older children consistently pass these down to younger siblings rather than discarding them when they outgrow the size — a reliable indicator of both durability and how much the apron is actually valued.
Difficulty: Intermediate · Time: 60–90 minutes · Materials: 1 large towel, bias tape, ribbon or cotton tape for ties
Tutorial: ihavetosay.typepad.com
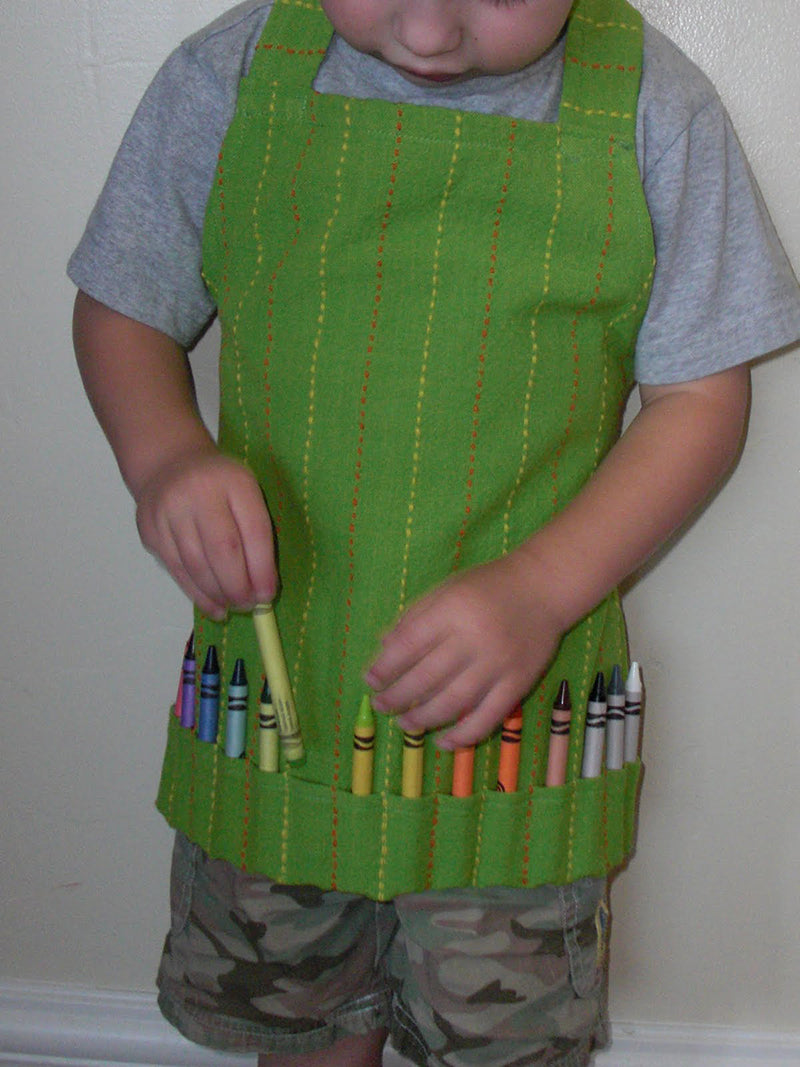
An art apron with individual pockets for each crayon solves a problem that every parent knows: crayons disappear into a jumbled box and no one can find the color they want. Each pocket is sized for one crayon, every color has a dedicated slot, and the whole set is visible and accessible while drawing. The organization is immediately obvious to children and they maintain it naturally.
This is the most sewing-intensive project for children on this list — the individual pockets require careful measuring and spacing to look neat — but the result is something children actively treasure rather than merely using. It travels well: fold the apron and all the crayons travel with it to school, grandparents' houses, or on trips. A set of the child's name crayons in the pockets makes this a complete and genuinely impressive gift. The pattern is in the tutorial linked below and is well-documented with step-by-step photos.
Difficulty: Intermediate · Time: 90–120 minutes · Materials: 1 large towel, ribbon for ties, thread, ruler for pocket spacing
Tutorial: obsessivelystitching.blogspot.com
Decorative pillows, baby bibs, dog toys, coasters, napkins, potholders, appliance covers, mats, bar stool covers, café curtains, tote bags, shoe bags, laptop bags, lunch bags, coin purses, wallets, book covers, and a wide variety of aprons for adults and children. The 100% cotton plain weave also accepts fabric paint, embroidery, dye, and stamping — making it suitable for decorative crafts as well as sewn projects.
One towel is enough for a half apron. Two or three are needed for a full-length apron with bib. Most apron projects also require ribbon, cotton tape, or extra fabric strips for ties and waistbands. The 27×27 inch flour sack towel provides the most usable fabric area for apron projects.
The 27×27 inch square is the most versatile craft size — large enough for a half apron, pillow cover, or tote bag. The 19×28 inch rectangular format suits curtains, laptop bags, and projects where a longer piece is useful. For small items like coasters, coin purses, and napkins, a single 27×27 towel typically yields 4–6 finished pieces.
White or natural unbleached 100% cotton at 130 thread count — the standard flour sack construction. The tight plain weave is easy to cut cleanly, sews without fraying excessively, and holds both machine and hand stitching well. Avoid towels with any synthetic content or fabric softener treatment — both affect how the fabric behaves under a needle and how it accepts dye and paint.
Yes — 100% cotton flour sack fabric accepts fabric dye, fabric paint, fabric markers, and stamping ink very well. The tight plain weave holds color cleanly without bleeding. For best results with dye, pre-wash the towel first to remove any finishing residue. Heat-set fabric paint with an iron after it dries to make it permanent and washable.
Flour sack cotton is one of the best embroidery fabrics available — the tight 130 thread count plain weave holds stitch definition cleanly without puckering under normal tension. No stabilizer is required for hand embroidery. For machine embroidery, a tear-away or cut-away stabilizer on the back prevents distortion during hooping. Transfer your design using a water-soluble fabric pen or iron-on transfer paper.
Blank flour sack towels are available with no minimum order from our wholesale collection — 5 sizes, 8 colors, 100% cotton, pre-washed and pre-shrunk. Volume pricing applies from single units up to case quantities, with free shipping on orders over $200 to the continental US. Ships in 1 business day from California and Georgia warehouses.

Written by
Mary's Kitchen Towels Team
We supply blank flour sack towels, aprons, and canvas totes to crafters and makers — no minimum, 5 sizes, ships in 1 business day. Shop wholesale blanks →


